Winter camping occupies a specific niche in the camping world — it filters out the crowds, delivers a quieter and more dramatic landscape, and demands a level of preparation that tent camping in July does not. The payoff for getting it right is genuine: snow-covered campgrounds to yourself, wildlife that is more visible against winter landscapes, and the deep satisfaction of being warm when everything around you is cold.
The risks of getting it wrong are serious. Hypothermia does not require extreme cold — it can develop in temperatures as mild as 40°F with wet clothing and wind. The difference between a successful winter camping trip and a dangerous one is knowledge and preparation.
How Cold Is Cold? Understanding Temperature Ratings
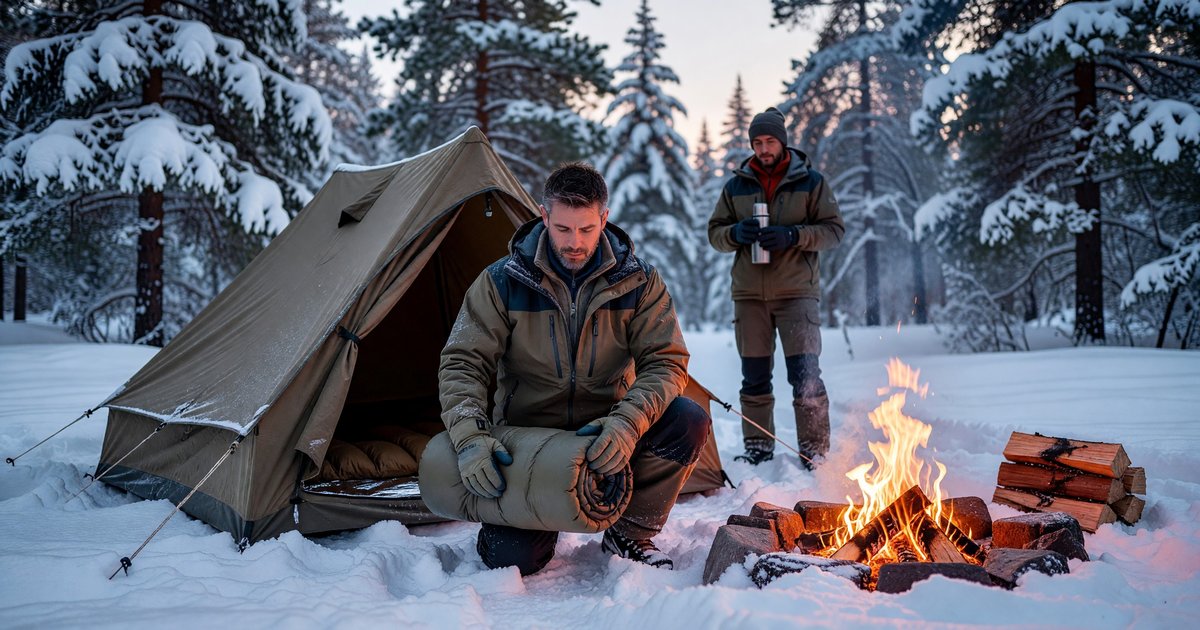
The first gear decision in winter camping is your sleeping bag, and the first concept to understand is the EN/ISO temperature rating system.
Sleeping bags are rated to a standard: the Limit temperature is the lowest temperature at which a standard-size adult male can sleep for eight hours without hypothermia. The Comfort temperature is warmer — the temperature at which a standard adult female can sleep comfortably. The Extreme rating marks the survival threshold.
If a bag is rated to 20°F, that means a standard male can survive in it at 20°F — not sleep comfortably. For comfortable sleep, select a bag rated 10-15°F below the coldest temperature you expect to encounter. A 0°F bag used at 15°F provides genuine warmth.
For winter camping in continental North America, a 0°F to 20°F bag covers most situations. For high-altitude or extreme cold camping, a -20°F bag provides genuine margin.
Sleeping pad R-value is as important as sleeping bag rating for cold conditions. R-value measures a pad’s resistance to heat transfer — the number the ground will pull heat away from you regardless of how warm your sleeping bag is. For cold-weather camping, target an R-value of 4 or higher. Stacking two pads (foam plus inflatable) adds their R-values and is often warmer and more reliable than a single high-R inflatable.
Layering: The System That Actually Works
The classic layering system — base, mid, shell — exists for a reason: it is modular and adaptable. Understanding each layer’s function prevents the most common cold-weather mistake, which is wearing too much and sweating, then getting cold.
Base layer: Merino wool or synthetic (polyester) that wicks moisture away from skin. Never cotton — cotton holds moisture and loses insulating value when wet. A quality merino base layer maintains warmth whether slightly damp or dry.
Mid layer: The insulation. Fleece, down jacket, or synthetic puffy. This is what keeps you warm. Match the weight to conditions — a midweight fleece for temperatures above 25°F, a down or synthetic puffy for colder conditions. Bring multiple options if the temperature range is wide.
Shell layer: Wind and moisture protection. A softshell for dry cold, a hardshell with waterproof-breathable membrane (Gore-Tex or equivalent) for wet or mixed conditions. The shell does not insulate — it protects the insulation beneath from wind and precipitation.
Extremities: The hands, feet, and head lose heat disproportionately. Wool or synthetic hiking socks, a warm hat that covers ears, and gloves rated for the temperature (mittens are warmer than gloves at equivalent weights — critical knowledge for very cold days).
The key operational rule: regulate before you sweat. When you are active and starting to warm up, remove a layer before you perspire. Wet insulation loses most of its thermal value, and a sweaty base layer in cold air accelerates heat loss.
Campfire Management in Cold Weather
Fire serves a different function in winter camping than in summer. In summer, a campfire is primarily atmosphere. In winter, it provides warmth that supplements your gear, dries damp clothing, and serves as a critical psychological anchor for the group.
Building a fire in cold, wet, or snowy conditions requires different technique than a dry-weather fire.
Start with dry tinder no matter how wet the environment is. Carry commercially made fire starters (wax-based, waterproof) or make your own (dryer lint, petroleum jelly, cotton balls — in a sealed plastic bag). Wood on the ground in wet conditions is often wet through; carry your own dry kindling or split larger sections of wood to get to the dry core.
Build the fire on a platform. In snow, a base of green logs prevents the fire from melting down into the snow and extinguishing itself. Four pieces of green log in a square, then your fire on top.
Size the fire appropriately. A hot, moderate-size fire is more effective for warmth than a massive, inefficient one. A fire that’s too large spreads heat widely but doesn’t warm the people sitting near it as effectively as a focused, hot firebox.
Observe campfire restrictions. Winter does not mean fire season is over. Many western states and national forests maintain fire restrictions through winter based on fuel moisture levels, not just temperature. Check the National Interagency Fire Center for current conditions and always check with the managing ranger district for area-specific restrictions.
Food and Water in Cold Weather
Cold temperatures increase caloric demands significantly. Your body burns more to maintain core temperature. Plan for higher food consumption — 25-50% more calories than you would eat camping in mild conditions is a reasonable estimate for active winter camping in below-freezing temperatures.
Fat and carbohydrate-heavy foods fuel cold-weather metabolism more efficiently than protein-heavy foods in the field. Trail mix, nuts, chocolate, nut butter, instant mashed potatoes, and hot instant oatmeal are practical winter camping foods.
Water management is the hidden challenge of winter camping. Dehydration is common in cold weather because the thirst sensation is suppressed. Drink water on a schedule, not when you feel thirsty. At least 3-4 liters per person per day for active winter camping.
Water sources freeze in cold temperatures. Plan for either carrying all water or melting snow. Melting snow is slow and fuel-intensive — approximately 8-10 parts of packed snow yield 1 part water. Bring an adequate fuel supply for your stove if snow melting is in the plan.
Keep water bottles close to your body inside your sleeping bag overnight to prevent freezing. An insulated bottle sleeve extends the window before freezing, but in very cold conditions, body heat is the most reliable prevention.
Safety Considerations Specific to Winter Camping
Tell someone your plan. More specifically than summer camping — your destination, the route to get there, and when to call for help if you have not checked in. Winter conditions complicate search and rescue significantly.
Know hypothermia symptoms. Uncontrollable shivering is the earliest warning sign. After shivering stops and the person becomes confused, speech is slurred, and coordination fails — this is hypothermia, not “warming up.” Treatment in the field: get them out of wet clothing, into dry insulation, into a sleeping bag, with a warm (not hot) water bottle against the core. See the CDC’s guidance on cold-weather health risks for the clinical breakdown.
Avalanche awareness. If winter camping in or near mountainous terrain with snowpack, understand avalanche risk and terrain. An avalanche beacon, probe, and shovel are standard equipment for travel on or under avalanche-prone slopes. A formal avalanche safety course is worth taking before any mountain winter camping.
Camp setup. In snow, tent stakes do not hold the way they do in firm ground. Use deadman anchors — stuff sacks filled with snow and buried horizontally — to stake out your tent. Stomp a platform for your tent floor to compact the snow and prevent cold spots.
For campground-based winter camping with RV hookups, see our complete guide to RV hookups — managing water connections in freezing temperatures is its own set of considerations.
Frequently Asked Questions
What temperature sleeping bag do I need for winter camping? For comfortable sleep, choose a sleeping bag rated 10-15°F below the coldest temperature you expect. For most continental US winter camping, a 0°F to 20°F rated bag covers conditions adequately. The EN/ISO Limit rating indicates survival temperature, not comfort — the Comfort rating is a better planning guide.
What is the biggest mistake beginners make winter camping? Overdressing and sweating, then getting cold. In cold weather, the rule is to regulate before you perspire — remove a layer when you start warming up from activity, before you sweat through your base layer. Wet insulation loses most of its thermal value and causes heat loss far faster than the cold alone.
How do I keep my water from freezing while winter camping? Sleep with water bottles inside your sleeping bag overnight. During the day, keep water in an insulated sleeve or inside your jacket close to your body. In very cold conditions, plan to melt snow using a camp stove and carry adequate fuel for the additional burn time.
What are the signs of hypothermia while camping? Uncontrollable shivering is the earliest warning sign. As hypothermia progresses, shivering may stop and be replaced by confusion, slurred speech, and poor coordination — these indicate a medical emergency. Field treatment: remove wet clothing, replace with dry insulation, get the person into a sleeping bag, and apply warm water bottles against the torso.
Are campgrounds open in winter? Many campgrounds close for winter, particularly in northern states and at higher elevations. Some remain open year-round with reduced services. State park websites and recreation.gov show seasonal closure dates for specific campgrounds.
Further Reading from Authoritative Sources
- CDC — Hypothermia and Cold Weather Safety — Clinical overview of hypothermia symptoms, stages, and field treatment protocols.
- National Park Service — Winter Camping Safety — NPS guidance on winter camping safety including preparation, gear standards, and weather planning.