A level RV is not a comfort preference — it has functional consequences. An RV refrigerator designed for propane absorption cooling requires near-level operation to function properly. An unlevel slide-out on some systems creates stress on the slide mechanism. An unlevel tank can read inaccurately on sensors. A level coach is also simply more comfortable to live in for more than a few hours.
Leveling procedure varies by RV type and what systems it has, but the fundamentals are the same for everyone.
Why Leveling Matters: The Refrigerator Issue
The most critical functional reason to level an RV is the refrigerator. Most RV refrigerators are absorption-style units — they use heat (from propane or electric resistance heating element) to drive a chemical cycle that produces cooling. This process depends on gravity and fluid flow in a specific orientation. An absorption refrigerator that operates significantly off-level will eventually stop cooling efficiently, and in severe cases (substantially off-level for extended periods), the cooling unit can be permanently damaged.
The standard tolerance is within 3 degrees of level side-to-side and front-to-back. This is achievable at virtually any campsite with proper technique and the right leveling equipment.
Compressor refrigerators (found in some newer trailers and van builds, similar to household refrigerators) are less sensitive to leveling and tolerate off-level operation better. If your RV has a compressor fridge, leveling is still good practice but less functionally critical.
Assessing the Campsite
Before you set up, walk the site and assess the grade. Which way does the site slope? A simple bubble level placed on the step, floor, or cabinet surface gives you a reading. Many smartphone apps provide a digital level that is accurate enough for this purpose.
Identify which direction you need to lift: are you raising the driver’s side or passenger side? Are you raising the front or rear? These may both apply at once — a campsite that slopes diagonally requires both side-to-side and front-to-back correction.
For towable trailers: disconnect the trailer from the tow vehicle before doing precise leveling. The hitch coupling affects the reading.
Tools for Manual Leveling
Leveling blocks: Interlocking plastic blocks (brands include Lynx Levelers, Camco Leveling Blocks, Tri-Lynx) stack to create a ramp that you drive onto. The blocks create a raised surface under one or more tires to correct the low side of the coach. Drive-on leveling requires a spotter or a level inside the coach to tell you when to stop.
Stackable wedges: The simpler alternative — drive-on ramps that achieve 1-3 inches of elevation. Quick to deploy, but limited in the correction range they provide.
Tongue jack (trailers): The front A-frame jack on a travel trailer provides front-to-back leveling adjustment after the side-to-side correction is made on blocks. Extend it until the front is level with the rear, then retract it slightly to allow the trailer to settle onto the blocks under load.
Stabilizing jacks: The four corner jacks on most trailers are stabilizers, not leveling jacks. They are designed to reduce wobble and movement in an already-leveled coach, not to raise the coach off the ground for leveling purposes. Using stabilizers to level a significantly off-level trailer is both ineffective and can damage the jack mechanisms.
Manual Leveling Sequence: Travel Trailers
Step 1: Side-to-side first. Determine which side of the trailer needs to be raised. Place leveling blocks on the low side, in front of the tires. Drive the trailer forward onto the blocks slowly, with a spotter outside or a level inside. Stop when the coach is level side-to-side, or close to it.
Step 2: Chock the tires. Before unhitching, chock the wheels on both sides of all axles. Wheel chocks prevent the trailer from rolling when the tongue jack is adjusted and the hitch is disconnected.
Step 3: Unhitch and adjust front-to-back. Unhitch from the tow vehicle. Adjust the tongue jack to bring the front of the trailer level with the rear. The bubble level inside tells you when you are at level.
Step 4: Deploy stabilizing jacks. After the coach is level, lower the corner stabilizing jacks until they make firm contact with the ground. On uneven ground, you may need pads (small blocks or dedicated pad plates) under the jack feet to prevent them from sinking into soft earth or penetrating hard surfaces.
Step 5: Verify with a level. Check your interior level. Check the refrigerator’s built-in level if it has one. Make any small adjustments via the tongue jack.
Motorhome Leveling Sequence
Motorhomes require the same side-to-side and front-to-back correction, but the process differs slightly:
Drive-on leveling: Position the motorhome with leveling blocks under the appropriate tires. For a large motorhome, this can require multiple sets of blocks on one or both sides. The longer wheelbase of a Class A makes drive-on leveling adjustments larger in displacement.
Manual hydraulic jacks (coach-mounted): Many Class A and Class C motorhomes have manual or automatic hydraulic leveling jacks built in. Manual systems require you to extend each jack individually and monitor a level indicator (often in a dashboard display) until the coach is level. Auto-level makes this simpler.
Slide-out deployment after leveling: Deploy slides after the coach is level. Most manufacturers recommend this sequence — slides out of a level coach operate under less stress and are less likely to have seal issues.
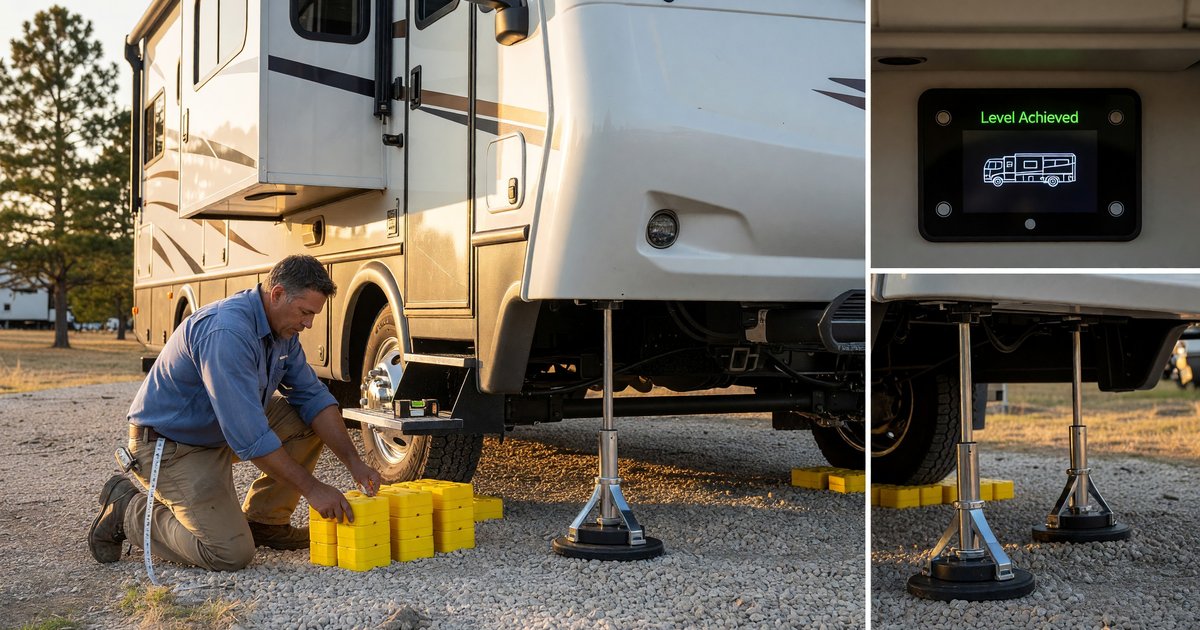
Automatic Leveling Systems
Auto-leveling systems — HWH, Lippert, PowerGear, and others — use sensors and computer-controlled hydraulic or electric jacks to automatically find and achieve level position.
How they work: After the driver puts the coach in park and activates the system, sensors measure the current level position. The controller commands individual jack cylinders to extend until the level tolerance is met. The sequence (which jacks deploy in what order) varies by system.
Auto-leveling limitations: Auto-leveling systems work within a defined range of site grade. Severely off-level sites may exceed the system’s travel and require manual adjustment — leveling blocks under the wheels — before the auto system can finish the job. Most systems will error or stop if they reach the end of their travel without achieving level.
Maintenance: Auto-leveling fluid (hydraulic systems) and jack seal condition are maintenance items. Leaking jacks or low fluid cause performance degradation that is often the first sign of system wear. Inspect jack boots (rubber dust seals around the cylinder shafts) annually.
For the full hookup sequence after leveling, see our complete guide to RV campground hookups.
Frequently Asked Questions
Why does my RV need to be level? The most critical functional reason is the refrigerator. RV absorption refrigerators require operation within 3 degrees of level — sustained off-level operation reduces efficiency and can permanently damage the cooling unit. Leveling also reduces slide-out stress and improves the living experience.
What are stabilizing jacks used for? Stabilizing jacks reduce wobble in an already-leveled coach — they are not leveling jacks. Using them to lift a trailer for leveling can damage the mechanisms. Level first with wheel blocks and tongue jack, then deploy stabilizers.
What order do I level an RV in? For trailers: side-to-side first (blocks under low-side tires), then chock wheels, unhitch, and level front-to-back with the tongue jack. Deploy stabilizers last. For motorhomes: level with blocks or hydraulic jacks, then deploy slides.
How much off-level is too much for an RV refrigerator? The standard tolerance is 3 degrees off-level in any direction. Beyond this, cooling efficiency decreases. Sustained significantly off-level operation risks permanent damage to the cooling unit.
How do automatic RV leveling systems work? Sensors measure current level and a controller extends hydraulic or electric jacks until the target level is reached. Auto systems work within a defined range — severely off-level sites may require manual block placement before the auto system can finish.
Further Reading from Authoritative Sources
- RVIA — RV Setup and Operation Safety — Industry guidance on proper RV setup procedures including leveling, stabilization, and slide-out operation.
- Go RVing — Campsite Setup Guide — Practical campsite setup sequence for both trailers and motorhomes, including leveling best practices.
